本文将会通过TensorRT C++ API来完成一个MNIST手写数字识别模型的转换、推理过程,并给出相应代码,在runtime阶段将会使用最新的enqueueV3方法。
代码/模型文件已上传GitHub仓库:https://github.com/cyberyang123/Learning-TensorRT

图片来源:https://learnopencv.com/how-to-run-inference-using-tensorrt-c-api/
PyTorch模型搭建
这里搭建了一个简单的卷积网络,如果你在Windows系统上跑的话你可能需要将num_workers改成0
import torch
from torch import nn
from torchvision import datasets, transforms

# 这里为了简化runtime的步骤,不对图像进行归一化处理
transform = transforms.Compose([transforms.ToTensor()])

train_data = datasets.MNIST(root = "./data/",
                            transform=transform,
                            train = True,
                            download = True)

test_data = datasets.MNIST(root="./data/",
                           transform = transform,
                           train = False)

train_loader = torch.utils.data.DataLoader(train_data,batch_size=64,
                                          shuffle=True,num_workers=2)
test_loader = torch.utils.data.DataLoader(test_data,batch_size=64,
                                          shuffle=True,num_workers=2)

import torch.nn.functional as F
class CNN(nn.Module):
    def __init__(self):
        super(CNN,self).__init__()
        self.conv1 = nn.Conv2d(1,32,kernel_size=3,stride=1,padding=1)
        self.pool = nn.MaxPool2d(2,2)
        self.conv2 = nn.Conv2d(32,64,kernel_size=3,stride=1,padding=1)
        self.fc1 = nn.Linear(64*7*7,1024)
        self.fc2 = nn.Linear(1024,512)
        self.fc3 = nn.Linear(512,10)

    def forward(self,x):
        x = self.pool(F.relu(self.conv1(x)))
        x = self.pool(F.relu(self.conv2(x)))
        x = x.view(-1, 64 * 7* 7)
        x = F.relu(self.fc1(x))
        x = F.relu(self.fc2(x))
        x = self.fc3(x)
        return x

net = CNN()

import torch.optim as optim
criterion = nn.CrossEntropyLoss()
optimizer = optim.SGD(net.parameters(), lr=0.001, momentum=0.9)

device = torch.device("cuda:0" if torch.cuda.is_available() else "cpu")
net = net.to(device)
for epoch in range(20):
    running_loss = 0.0
    total_num, total_cor = 0,0
    for i,data in enumerate(train_loader,0):#0是下标起始位置默认为0
        #inputs,labels = data
        inputs,labels = data[0].to(device), data[1].to(device)
        #初始为0,清除上个batch的梯度信息
        optimizer.zero_grad()

        #前向+后向+优化
        outputs = net(inputs)
        loss = criterion(outputs,labels)
        loss.backward()
        optimizer.step()

        # loss 的输出,每个一百个batch输出,平均的loss
        running_loss += loss.item()
        if i%100 == 99:
            print('[%d,%5d] loss :%.3f' %
                 (epoch+1,i+1,running_loss/100))
            running_loss = 0.0

        correct = 0
        total = 0
        _, predicted = torch.max(outputs.data, 1)
        total = labels.size(0)# labels 的长度
        total_num = total_num + total
        correct = (predicted == labels).sum().item() # 预测正确的数目
        total_cor = total_cor + correct

    print("正确率:" + str(total_cor/total_num))


print('Finished Training')

PATH = './mnist_net.pt'
torch.save(net.state_dict(), PATH)

print('Saved Model')
pt2onnx
这部分代码可以复用,换个模型也可以导出onnx,建议在导出的时候修改一下input、output层的命名。
import torch
import torch.nn as nn
import torch.nn.functional as F

class CNN(nn.Module):
    def __init__(self):
        super(CNN,self).__init__()
        self.conv1 = nn.Conv2d(1,32,kernel_size=3,stride=1,padding=1)
        self.pool = nn.MaxPool2d(2,2)
        self.conv2 = nn.Conv2d(32,64,kernel_size=3,stride=1,padding=1)
        self.fc1 = nn.Linear(64*7*7,1024)
        self.fc2 = nn.Linear(1024,512)
        self.fc3 = nn.Linear(512,10)

    def forward(self,x):
        x = self.pool(F.relu(self.conv1(x)))
        x = self.pool(F.relu(self.conv2(x)))
        x = x.view(-1, 64 * 7* 7)
        x = F.relu(self.fc1(x))
        x = F.relu(self.fc2(x))
        x = self.fc3(x)
        return x

net = CNN()
net.load_state_dict(torch.load('mnist_net.pt'))
net.eval()

torch_input = torch.randn(1, 1, 28, 28)
onnx_program = torch.onnx.export(net, torch_input, "MNIST.onnx", export_params=True)
onnx2engine
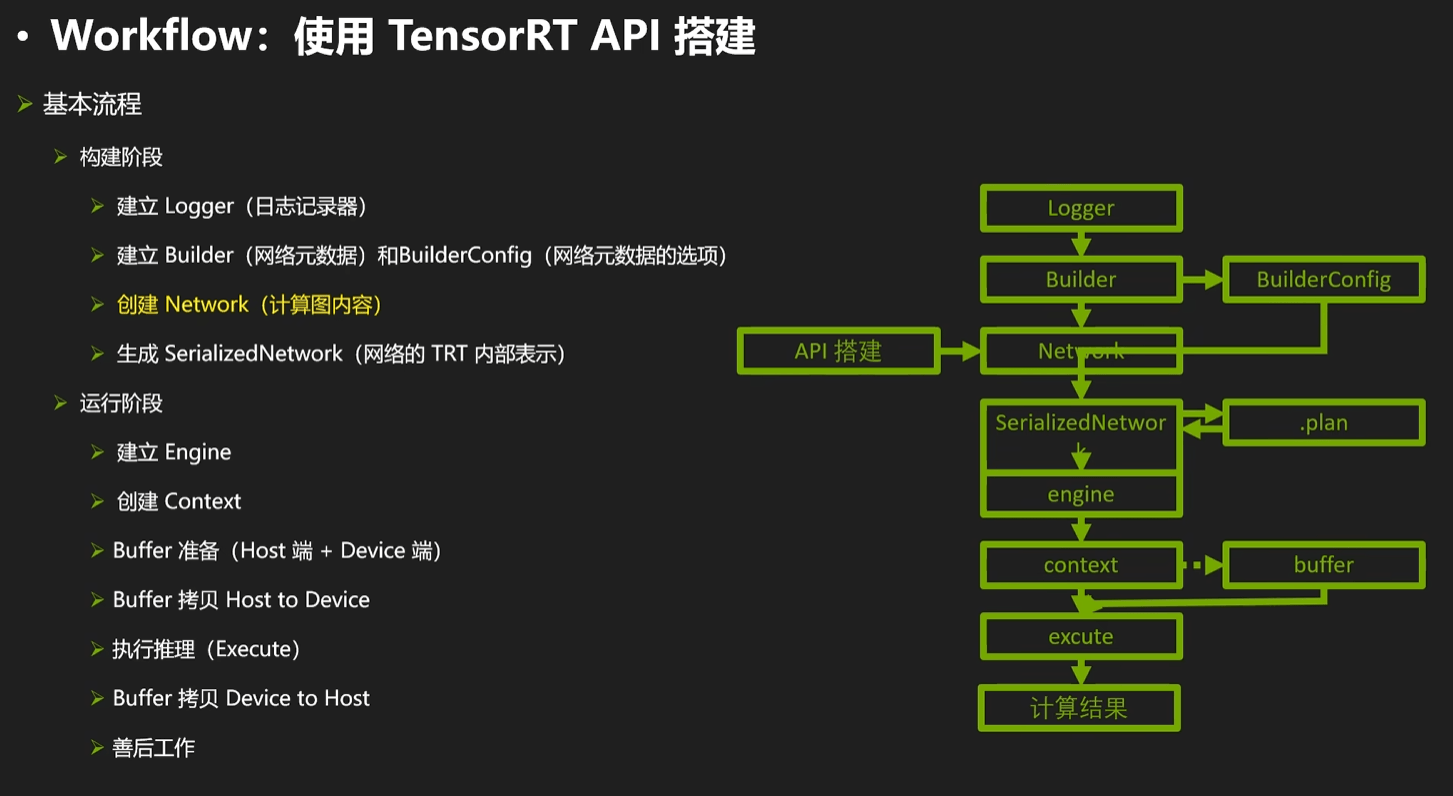
从现在就开始C++的部分了,TensorRT从构建engine到推理的过程如下图所示:

图片来源:https://www.bilibili.com/video/BV1jj411Z7wG/
#include <stdio.h>
#include <math.h>
#include <string>
#include <iostream>
#include <fstream>
#include <vector>
#include <memory>
#include <functional>
#include <unistd.h>
#include <chrono>
#include <assert.h>

#include <NvInfer.h>
#include <NvOnnxParser.h>

using namespace std;
using namespace nvinfer1;

// 以下示例捕获所有警告消息,但忽略信息性消息
class Logger : public ILogger
{
    void log(Severity severity, const char* msg) noexcept override
    {
        // 抑制信息级别的消息
        if (severity <= Severity::kWARNING)
            cout << msg << endl;
    }
};

int main(int argc, char **argv)
{
    // 实例化ILogger
    Logger logger;

    // 创建builder
    auto builder = unique_ptr<IBuilder>(createInferBuilder(logger));

    // 创建网络(显性batch)
    uint32_t flag = 1U <<static_cast<uint32_t>
    (NetworkDefinitionCreationFlag::kEXPLICIT_BATCH);
    auto network = unique_ptr<INetworkDefinition>(builder->createNetworkV2(flag));

    // 创建ONNX解析器:parser
    auto parser = unique_ptr<nvonnxparser::IParser>(nvonnxparser::createParser(*network, logger));
    // 读取文件
    char *file_path = "MNIST.onnx";
    parser->parseFromFile(file_path, static_cast<int32_t>(ILogger::Severity::kWARNING));

    // 创建构建配置,用来指定trt如何优化模型
    auto config = unique_ptr<IBuilderConfig>(builder->createBuilderConfig());
    // 设定配置
    // 工作空间大小
    config->setMemoryPoolLimit(MemoryPoolType::kWORKSPACE, 1U << 20);
    // 设置精度
    config->setFlag(nvinfer1::BuilderFlag::kFP16);

    // 创建引擎
    auto engine = unique_ptr<IHostMemory>(builder->buildSerializedNetwork(*network, *config));

    //序列化保存engine
    ofstream engine_file("./MNIST.engine", ios::binary);
    assert(engine_file.is_open() && "Failed to open engine file");
    engine_file.write((char *)engine->data(), engine->size());
    engine_file.close();

    cout << "Engine build success!" << endl;
    return 0;
}
智能指针真是个好东西,用完是不需要特意删除的
runtime
TensorRT有两个API可以执行推理,分别是execute()和enqueue(),区别在于前者是同步的,后者是异步的;enqueue()有3个版本,它们的区别可见下图,本文将使用最新的版本。

我从MNIST数据集里面取了10张照片放到了img文件夹下,用来测试推理。


#include <stdio.h>
#include <math.h>
#include <string>
#include <iostream>
#include <fstream>
#include <vector>
#include <memory>
#include <functional>
#include <unistd.h>
#include <chrono>
#include <assert.h>

#include <NvInfer.h>
#include <NvOnnxParser.h>
#include <NvInferRuntime.h>
#include <opencv2/opencv.hpp>

using namespace std;
using namespace nvinfer1;

// 以下示例捕获所有警告消息,但忽略信息性消息
class Logger : public ILogger
{
    void log(Severity severity, const char* msg) noexcept override
    {
        // 抑制信息级别的消息
        if (severity <= Severity::kWARNING)
            cout << msg << endl;
    }
};

// 加载模型文件
std::vector<unsigned char> load_engine_file(const std::string &file_name)
{
    std::vector<unsigned char> engine_data;
    std::ifstream engine_file(file_name, std::ios::binary);
    assert(engine_file.is_open() && "Unable to load engine file.");
    engine_file.seekg(0, engine_file.end);
    int length = engine_file.tellg();
    engine_data.resize(length);
    engine_file.seekg(0, engine_file.beg);
    engine_file.read(reinterpret_cast<char *>(engine_data.data()), length);
    return engine_data;
}

int softmax(const float(&rst)[10]){
    float cache = 0;
    int idx = 0;
    for(int i = 0; i < 10; i += 1)
    {
        if(rst[i]>cache)
        {
            cache = rst[i];
            idx = i;
        };
    };
    return idx;
}

int main(int argc, char **argv)
{
    // 实例化ILogger
    Logger logger;

    // 创建runtime
    auto runtime = unique_ptr<IRuntime>(createInferRuntime(logger));

    // 读取engine,反序列化
    string file_path = "MNIST.engine";
    auto plan = load_engine_file(file_path);
    auto engine = shared_ptr<ICudaEngine>(runtime->deserializeCudaEngine(plan.data(), plan.size()));

    // 创建执行上下文
    auto context = unique_ptr<IExecutionContext>(engine->createExecutionContext());

    auto idims = engine->getTensorShape("input.1");// 这里的名字可以在导出时修改
    auto odims = engine->getTensorShape("23");
    Dims4 inputDims = { 1, idims.d[1], idims.d[2], idims.d[3] };
    Dims2 outputDims = { 1, 10 };
    context->setInputShape("input.1", inputDims);

    void* buffers[2];
    const int inputIndex = 0;
    const int outputIndex = 1;

    cudaMalloc(&buffers[inputIndex], 1 * 28 * 28 * sizeof(float));
    cudaMalloc(&buffers[outputIndex], 10 * sizeof(float));

    // 设定数据地址
    context->setTensorAddress("input.1", buffers[inputIndex]);
    context->setTensorAddress("23", buffers[outputIndex]);

    // 创建cuda流
    cudaStream_t stream;
    cudaStreamCreate(&stream);

    // 读取文件执行推理
    for(int i = 0; i < 10; i += 1)
    {
        // 读取图片
        cv::Mat img0;
        std::string file_name = "img/img" + std::to_string(i) + ".png";
        img0 = cv::imread(file_name, 0);// 0为灰度图片
        if (img0.empty())  //检测image有无数据,无数据 image.empty()返回 真
        {
            std::cout << "Could not open or find the image" << std::endl;
            return -1;
        }
        cv::Mat img;
        img0.convertTo(img, CV_32F);
        // cv::imshow(file_name,img);
        // cv::waitKey(0);

        // 将图像拷贝到GPU
        cudaMemcpyAsync(buffers[inputIndex], img.data,1 * 28 * 28 * sizeof(float), cudaMemcpyHostToDevice, stream);

        //执行推理
        context->enqueueV3(stream);
        cudaStreamSynchronize(stream);

        float rst[10];
        cudaMemcpyAsync(&rst, buffers[outputIndex], 1 * 10 * sizeof(float), cudaMemcpyDeviceToHost, stream);

        cout << file_name << " 推理结果: " << softmax(rst) <<endl;
    }

    cudaStreamDestroy(stream);
    cudaFree(buffers[inputIndex]);
    cudaFree(buffers[outputIndex]);
}
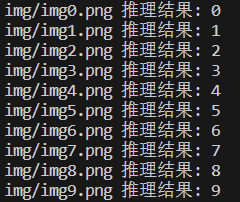
成功得到结果

参考
https://zhuanlan.zhihu.com/p/112829371
https://docs.nvidia.com/deeplearning/tensorrt/archives/index.html
https://www.dotndash.net/2023/03/09/using-tensorrt-with-opencv-cuda.html