本文将会通过TensorRT C++来部署一个基于yolov8算法的目标检测任务,内容包含:yolov8预处理后处理、使用parser导入ONNX模型、通过enqueueV3执行推理的方式及其代码实现。
请注意,下文内容基本上是在重复造轮子,仅适合学习使用,如果你真的有如Jetson平台高性能部署的需求,建议参考TensorRTx(https://github.com/wang-xinyu/tensorrtx)中的代码。
相关代码、模型文件已上传GitHub仓库:https://github.com/cyberyang123/Learning-TensorRT
导出ONNX
yolov8可以通过命令行一键导出
yolo export model=yolov8n.pt format=onnx  # export official model
yolo export model=path/to/best.pt format=onnx  # export custom trained model
构建engine
本文暂时不涉及到半精度、INT8量化等加速操作,此部分代码与上一篇文章相同
#include <stdio.h>
#include <math.h>
#include <string>
#include <iostream>
#include <fstream>
#include <vector>
#include <memory>
#include <functional>
#include <unistd.h>
#include <chrono>
#include <assert.h>

#include <NvInfer.h>
#include <NvOnnxParser.h>

using namespace std;
using namespace nvinfer1;

// 以下示例捕获所有警告消息,但忽略信息性消息
class Logger : public ILogger
{
    void log(Severity severity, const char* msg) noexcept override
    {
        // 抑制信息级别的消息
        if (severity <= Severity::kWARNING)
            cout << msg << endl;
    }
};

int main(int argc, char **argv)
{
    // 实例化ILogger
    Logger logger;

    // 创建builder
    auto builder = unique_ptr<IBuilder>(createInferBuilder(logger));

    // 创建网络(显性batch)
    uint32_t flag = 1U <<static_cast<uint32_t>
    (NetworkDefinitionCreationFlag::kEXPLICIT_BATCH);
    auto network = unique_ptr<INetworkDefinition>(builder->createNetworkV2(flag));

    // 创建ONNX解析器:parser
    auto parser = unique_ptr<nvonnxparser::IParser>(nvonnxparser::createParser(*network, logger));
    // 读取文件
    char *file_path = "yolov8s.onnx";
    parser->parseFromFile(file_path, static_cast<int32_t>(ILogger::Severity::kWARNING));

    // 创建构建配置,用来指定trt如何优化模型
    auto config = unique_ptr<IBuilderConfig>(builder->createBuilderConfig());
    // 设定配置
    // 工作空间大小
    config->setMemoryPoolLimit(MemoryPoolType::kWORKSPACE, 1U << 20);
    // 设置精度
    config->setFlag(nvinfer1::BuilderFlag::kFP16);

    // 创建引擎
    auto engine = unique_ptr<IHostMemory>(builder->buildSerializedNetwork(*network, *config));

    //序列化保存engine
    ofstream engine_file("./yolov8s.engine", ios::binary);
    assert(engine_file.is_open() && "Failed to open engine file");
    engine_file.write((char *)engine->data(), engine->size());
    engine_file.close();

    cout << "Engine build success!" << endl;
    return 0;
}
图像预处理
yolov8s模型的输入为固定大小的1x3x640x640张量,为了适应不同大小的图像,这里需要引入LetterBox概念

为了将图片resize到模型可以接受的大小,同时保证图像的内容不会被扭曲,预处理时需要将图片缩放到长边长度刚好为640的程度,同时填充空白内容使得短边长度也为640,可见下图:

LetterBox中文意思是“信箱”,中间的图像可以看成是信,上下两边的黑边就像信箱一样将信件包裹起来。
void LetterBox(const cv::Mat& image, cv::Mat& outImage, cv::Vec4d& params, const cv::Size& newShape,
    bool autoShape, bool scaleFill, bool scaleUp, int stride, const cv::Scalar& color)
{
    if (false) {
        int maxLen = MAX(image.rows, image.cols);
        outImage = Mat::zeros(Size(maxLen, maxLen), CV_8UC3);
        image.copyTo(outImage(Rect(0, 0, image.cols, image.rows)));
        params[0] = 1;
        params[1] = 1;
        params[3] = 0;
        params[2] = 0;
    }

    cv::Size shape = image.size();
    float r = std::min((float)newShape.height / (float)shape.height,
        (float)newShape.width / (float)shape.width);
    if (!scaleUp)
        r = std::min(r, 1.0f);

    float ratio[2]{ r, r };
    int new_un_pad[2] = { (int)std::round((float)shape.width * r),(int)std::round((float)shape.height * r) };

    auto dw = (float)(newShape.width - new_un_pad[0]);
    auto dh = (float)(newShape.height - new_un_pad[1]);

    if (autoShape)
    {
        dw = (float)((int)dw % stride);
        dh = (float)((int)dh % stride);
    }
    else if (scaleFill)
    {
        dw = 0.0f;
        dh = 0.0f;
        new_un_pad[0] = newShape.width;
        new_un_pad[1] = newShape.height;
        ratio[0] = (float)newShape.width / (float)shape.width;
        ratio[1] = (float)newShape.height / (float)shape.height;
    }

    dw /= 2.0f;
    dh /= 2.0f;

    if (shape.width != new_un_pad[0] && shape.height != new_un_pad[1])
    {
        cv::resize(image, outImage, cv::Size(new_un_pad[0], new_un_pad[1]));
    }
    else {
        outImage = image.clone();
    }

    int top = int(std::round(dh - 0.1f));
    int bottom = int(std::round(dh + 0.1f));
    int left = int(std::round(dw - 0.1f));
    int right = int(std::round(dw + 0.1f));
    params[0] = ratio[0];
    params[1] = ratio[1];
    params[2] = left;
    params[3] = top;
    cv::copyMakeBorder(outImage, outImage, top, bottom, left, right, cv::BORDER_CONSTANT, color);
}
cv::Mat LetterBoxImg;
cv::Vec4d params;
LetterBox(img, LetterBoxImg, params, cv::Size(640, 640));openCV读取到的图像三个通道默认为BGR,而模型需要输入RGB通道的图像;同时还需要进行NHWC到NCHW排布方式的转换、归一化等操作,这里可以使用cv::dnn::blobFromImage函数来完成。
cv::Mat blob;
cv::dnn::blobFromImage(LetterBoxImg, blob, 1 / 255.0, cv::Size(640, 640), cv::Scalar(0, 0, 0), true, false, CV_32F);执行推理
推理的部分与之前MNIST的基本一致,注意需要修改申请GPU内存、转移数据时的大小
#include <stdio.h>
#include <math.h>
#include <string>
#include <iostream>
#include <fstream>
#include <vector>
#include <memory>
#include <functional>
#include <unistd.h>
#include <chrono>
#include <assert.h>
#include <NvInfer.h>
#include <NvOnnxParser.h>
#include <NvInferRuntime.h>
#include <opencv2/opencv.hpp>
#include "yolov8_utils.h"
// 以下示例捕获所有警告消息,但忽略信息性消息
class Logger : public nvinfer1::ILogger
{
void log(Severity severity, const char* msg) noexcept override
{
// 抑制信息级别的消息
if (severity <= Severity::kWARNING)
std::cout << msg << std::endl;
}
};
// 加载模型文件
std::vector<unsigned char> load_engine_file(const std::string &file_name)
{
std::vector<unsigned char> engine_data;
std::ifstream engine_file(file_name, std::ios::binary);
assert(engine_file.is_open() && "Unable to load engine file.");
engine_file.seekg(0, engine_file.end);
int length = engine_file.tellg();
engine_data.resize(length);
engine_file.seekg(0, engine_file.beg);
engine_file.read(reinterpret_cast<char *>(engine_data.data()), length);
return engine_data;
}
int main(int argc, char **argv)
{
// 实例化ILogger
Logger logger;
std::unique_ptr<nvinfer1::IRuntime> runtime = std::unique_ptr<nvinfer1::IRuntime>(nvinfer1::createInferRuntime(logger));
if (runtime == nullptr){return false;}
std::string file_path = "yolov8s.engine";
auto plan = load_engine_file(file_path);
auto engine = std::unique_ptr<nvinfer1::ICudaEngine>(runtime->deserializeCudaEngine(plan.data(), plan.size()));
if (engine == nullptr){return false;}
auto context = std::unique_ptr<nvinfer1::IExecutionContext>(engine->createExecutionContext());
if (context == nullptr){return false;}
auto idims = engine->getTensorShape("images");
auto odims = engine->getTensorShape("output0");
nvinfer1::Dims4 inputDims = { idims.d[0], idims.d[1], idims.d[2], idims.d[3] };
nvinfer1::Dims3 outputDims = { idims.d[0], idims.d[1], idims.d[2] };
context->setInputShape("images", inputDims);
void* buffers[2];
const int inputIndex = 0;
const int outputIndex = 1;
cudaMalloc(&buffers[inputIndex], idims.d[0] * idims.d[1] * idims.d[2] * idims.d[3] * sizeof(float));
cudaMalloc(&buffers[outputIndex], odims.d[0] * odims.d[1] * odims.d[2] * sizeof(float));
// 设定数据地址
context->setTensorAddress("images", buffers[inputIndex]);
context->setTensorAddress("output0", buffers[outputIndex]);
// 创建cuda流
cudaStream_t stream;
cudaStreamCreate(&stream);
// 读取文件执行推理
for(int i = 0; i < 2; i += 1)
{
// 读取图片
cv::Mat img;
std::string file_name = "img/img" + std::to_string(i) + ".jpg";
img = cv::imread(file_name);
if (img.empty()) //检测image有无数据,无数据 image.empty()返回 真
{
std::cout << "Could not open or find the image" << std::endl;
return -1;
}
cv::Mat LetterBoxImg;
cv::Vec4d params;
LetterBox(img, LetterBoxImg, params, cv::Size(640, 640));
cv::Mat blob;
cv::dnn::blobFromImage(img, blob, 1 / 255.0, cv::Size(640, 640), cv::Scalar(0, 0, 0), true, false, CV_32F);
// 将图像拷贝到GPU
cudaMemcpyAsync(buffers[inputIndex], blob.data,3 * 640 * 640 * sizeof(float), cudaMemcpyHostToDevice, stream);
//执行推理
if(context->enqueueV3(stream)){
std::cout << "enqueued successfully!" << std::endl;
}
cudaStreamSynchronize(stream);
float rst[1][84][8400];
cudaMemcpyAsync(&rst, buffers[outputIndex], 1 * 84 * 8400 * sizeof(float), cudaMemcpyDeviceToHost, stream);
postprocess(rst, img, params);
}
cudaStreamDestroy(stream);
cudaFree(buffers[inputIndex]);
cudaFree(buffers[outputIndex]);
}后处理

yolov8s模型的输出张量为1x84x8400,其中84=80+4,即为模型的可识别类别总数 + 框的四个坐标,8400为锚框的数量,后处理算法需要提取锚框的4个坐标整数、找到80个类别中权重(即输出)最大的与阈值进行比较,判断锚框是否保留

图片来源:https://blog.csdn.net/yangkai6121/article/details/133843368
在这里我直接遍历的全部8400个锚框,然后通过cv::dnn::NMSBoxes进行非极大值抑制。
void postprocess(float (&rst)[1][84][8400], cv::Mat &img, cv::Vec4d params)
{
std::vector<cv::Rect> boxes;
std::vector<float> scores;
std::vector<int> det_rst;
static const float score_threshold = 0.6;
static const float nms_threshold = 0.45;
std::vector<int> indices;
for(int Anchors=0 ;Anchors < 8400; Anchors++)
{
float max_score = 0.0;
int max_score_det = 99;
float pdata[4];
for(int prob = 4; prob < 84; prob++)
{
if(rst[0][prob][Anchors] > max_score){
max_score = rst[0][prob][Anchors];
max_score_det = prob - 4;
pdata[0] = rst[0][0][Anchors];
pdata[1] = rst[0][1][Anchors];
pdata[2] = rst[0][2][Anchors];
pdata[3] = rst[0][3][Anchors];
}
}
if(max_score >= score_threshold)
{
float x = (pdata[0] - params[2]) / params[0];
float y = (pdata[1] - params[3]) / params[1];
float w = pdata[2] / params[0];
float h = pdata[3] / params[1];
int left = MAX(int(x - 0.5 * w + 0.5), 0);
int top = MAX(int(y - 0.5 * h + 0.5), 0);
boxes.push_back(Rect(left, top, int(w + 0.5), int(h + 0.5)));
scores.emplace_back(max_score);
det_rst.emplace_back(max_score_det);
}
}
cv::dnn::NMSBoxes(boxes, scores, score_threshold, nms_threshold, indices);
for (int i = 0; i < indices.size(); i++) {
std::cout << boxes[indices[i]] << std::endl;
cv::rectangle(img, boxes[indices[i]], Scalar(255, 0, 0), 2, LINE_8,0);
}
cv::imshow("rst",img);
cv::waitKey(0);
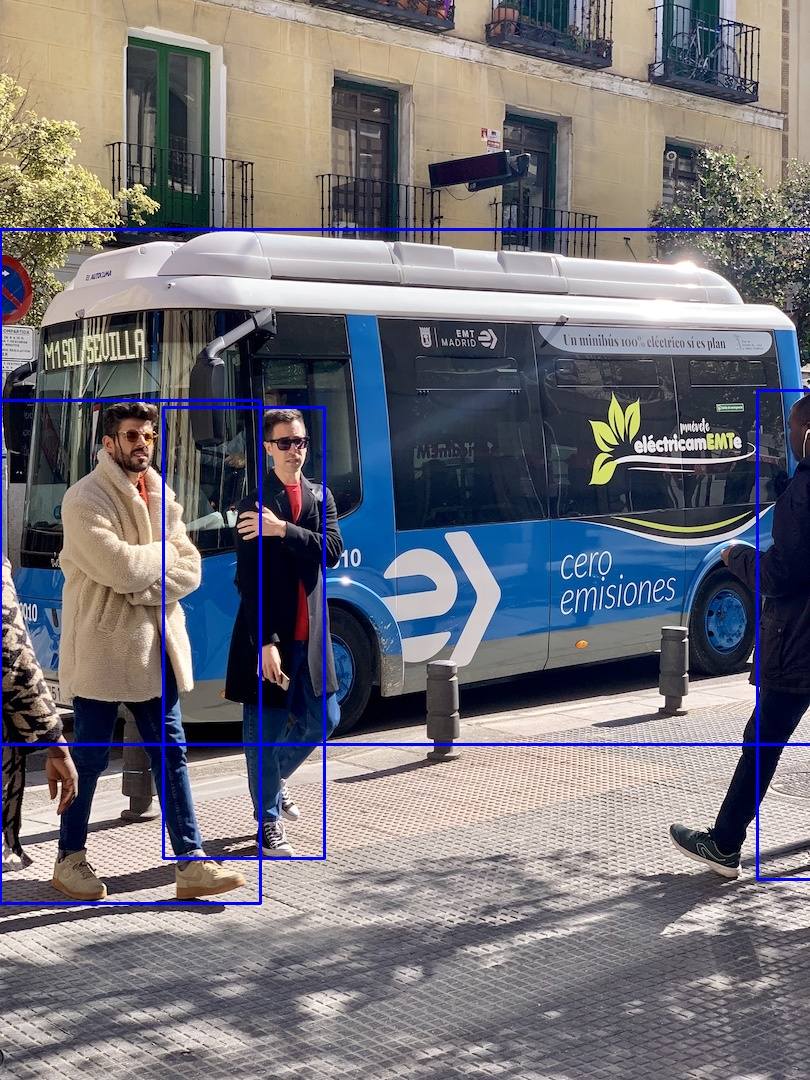
}如果不加入NMS,输出的结果将会是下图所示的样子:

参考
https://github.com/UNeedCryDear/yolov8-opencv-onnxruntime-cpp